Parallax Tutorial using CSS and jQuery
How to create parallax effects on scroll, in web design. By Andy Shora
← back to andyshora.com | Tweet this articleHow to implement parallax effects on scroll using CSS & jQuery
Ever wondered how to achieve parallax effects on scroll? I'll show you how simple it can be, using CSS & a bit of jQuery. I'm not a fan of long intros, so feel free to scroll straight down for the demo!
Performance Aims
- Minimise DOM interactions on scroll events.
Ideally we should only be interacting with the parallax elements at the breakpoints (start & stop positions), so we can try to make use of CSS fixed positioning to accomplish the desired parallax effect. Obviously if we're adding a speed to the effect later on, whereby the element moves at say double the speed of scroll, we're going to need to update the position on every scroll event.
Another important way of reducing the DOM interactions is to store all the static values from the parallax elements straight away when the page is loaded. The parallax settings defined in the HTML of each element will not change, so we would be sacrificing performance if we were grabbing these values on every scroll event. - For more complex animations, use hardware accelleration where possible.
Mobile devices are less powerful, which can cause jerkyness when dealing with animations applied dynamically through JavaScript. When we get to dealing with the speed property, we'll look at using transform properties to enable supported mobile devices to use the more powerful GPU to perform the animations.
Mobile Problems/Considerations
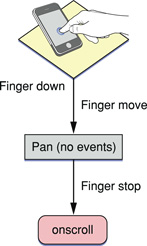
Previously I've referred to scroll events. Unfortunately, we have to deal with the following problem: iOS devices freeze DOM manipulation during scroll, queuing them to apply when the scroll finishes.. This is going to result in extremely jerky animations if we rely on the position of these events. Instead, we have to tie our animation logic to touch events if the browser supports them.
Binding scroll and touchmove events
As touchmove events stop when your finger leaves the screen, but the browser will continue to scroll for around a second as part of the 'slowing down' easing effect. For this reason, I've decided to bind both the touchmove event and the scroll event. The bug you'll see is when you swipe past the end of the container and release your touch before the brick has hit the bottom, it overflows the container, and position: relative is only applied when the queued scroll events are fired when the scroll transition has ended.
A solution for this problem (well, more of a workaround), is to design your parallax effects with this in mind. Consider placing an overlapping element with a higher z-index at the end point, so even if the brick overruns, it will be behind the higher element. If the overlapping element is tall enough, it should provide enough time for the scroll events to fire and position the brick relatively in the correct position.
Update: haven't been able to get this working correctly on iOS devices yet :-(
I've investigated using setInterval hacks to keep checking the scrollTop position of the window, but this feels dirty, and is still unreliable considering how infrequently the value is updated. RequestAnimationFrame is only available in iOS6, so stay tuned for an update for mobile performance, or feel free to help me out in the comments!
Update 2: Check out my demo showing the scroll event problems on mobile!
Demo time: Let's make the red brick fall down the page as we scroll!
We'll set bounds on the parallax effect, so the brick always stays within it's container.
- The CSS position value is shown inside the brick.
- For learning purposes, I've also shown the distance the viewport (the window) has been scrolled, and the distance of the element from the bottom of the viewport, as these values are used in the logic to start/stop/calculate the position of parallax elements.
HTML markup for the parallax element
For this demo we are using a simple <div>, which has the following data attributes set which define the parallax effect (all values are in pixels):
- data-start: The element will become fixed when the viewport bottom offset has reached this distance. You could change this to use the distance from the top, but personally I prefer it this way.
- data-stop: When the viewport has been scrolled this distance, the parallax effect should end, leaving the element positioned relatively where it was at the end of the scroll. i.e. at the bottom of the container.
- data-id: A unique id is used as a key in the parallaxElements array which stores these values on initialisation.
<div class="parallax brick" data-id="brick-1" data-start="200" data-stop="1150"></div>
CSS styles for the parallax element
The styles are pretty normal, but note the top property will be updated for the parallax effect.
.brick {
    width: 100px;
    height: 38px;
    padding: 10px 0 0 0;
    margin: 0 auto;
    display: inline-block;
    position: relative;
    top: 0;
    z-index: 1;
}
JavaScript (jQuery) for setting things up
We need to initialise all of the parallax effects when the document is ready, to try and minimise the amount of processing and DOM interaction done during scrolling.
- Store all of the parallax elements as objects inside an array.
- Attach a window resize event handler which updates values used during calculations.
- Auto-scroll to the top of the page on load.
var parallaxElements = [];
var windowHeight = 0;

$(document).ready(function() {

    windowHeight = $(window).height();
    $('html,body').scrollTop(1); // auto scroll to top

    // touch event check stolen from Modernizr
    var touchSupported = (('ontouchstart' in window) ||
                            window.DocumentTouch && document instanceof DocumentTouch);

    // if touch events are supported, tie our animation to the position to these events as well
    if (touchSupported) {

        $(window)
            .bind('touchmove', function(e) {
                var val = e.currentTarget.scrollY;
                parallax(val);
            });
    }

    $(window)
        .bind('scroll', function(e) {
            var val = $(this).scrollTop();
            parallax(val);
        });

    // update vars used in parallax calculations on window resize
    $(window).resize(function() {
        windowHeight = $(this).height();

        for (var id in parallaxElements) {
            parallaxElements[id].initialOffsetY = $(parallaxElements[id].elm).offset().top;
            parallaxElements[id].height = $(parallaxElements[id].elm).height();
        }
    });


    // get parallax elements straight away as they wont change
    // this will minimise DOM interactions on scroll events
    $('.parallax').each(function(){

        $elm = $(this);
        var id = $elm.data('id');

        // use data-id as key
        parallaxElements[id] = {
            id: $elm.data('id'),
            start: $elm.data('start'),
            stop: $elm.data('stop'),
            speed: $elm.data('speed'),
            elm: $elm[0],
            initialOffsetY: $elm.offset().top,
            height: $elm.height(),
            width: $elm.outerWidth()
        };

    });
});
JavaScript (jQuery) for achieving the parallax effects on scroll
Our aim is to scroll down to the element (the red brick), and achieve the following behaviour:
- When the distance between the bottom of the viewport and the brick reaches the data-start value, we set position: fixed so the brick then scrolls with with window.
- When it reaches the data-stop value, it becomes position: relative again, appearing to rest on the bottom of the container.
- For this example, we are not setting a speed, we just want the brick to appear to move at the same speed as the scroll.
function parallax(scrollTop) {

    for (var id in parallaxElements) {

        // distance of element from top of viewport
        var viewportOffsetTop = parallaxElements[id].initialOffsetY - scrollTop;

        // distance of element from bottom of viewport
        var viewportOffsetBottom = windowHeight - viewportOffsetTop;

        if ((viewportOffsetBottom >= parallaxElements[id].start) && (viewportOffsetBottom <= parallaxElements[id].stop)) {
            // element is now active, fix the position so when we scroll it stays fixed

            var speedMultiplier = parallaxElements[id].speed || 1;
            var pos = (windowHeight - parallaxElements[id].start);

            $(parallaxElements[id].elm)
                .css({
                    position: 'fixed',
                    top: pos+'px',
                    left: '50%',
                    marginLeft: -(parallaxElements[id].width/2) +'px'
                });

        } else if (viewportOffsetBottom > parallaxElements[id].stop) {
            // scrolled past the stop value, make position relative again

            $(parallaxElements[id].elm)
                .css({
                    position: 'relative',
                    top: (parallaxElements[id].stop-parallaxElements[id].start)+'px',
                    left: 'auto',
                    marginLeft: 'auto'
                });

        } else if (viewportOffsetBottom < parallaxElements[id].start) {
            // scrolled up back past the start value, reset position

            $(parallaxElements[id].elm)
                .css({
                    position: 'relative',
                    top: 0,
                    left: 'auto',
                    marginLeft: 'auto'
                });

        }
    }
}
Over and out.
I hope you've enjoyed this tutorial. I'll add some more advanced effects in the coming weeks, introducing speed, direction and rotation to parallax animations. In the mean time, I would love you to share the f*ck out of this article, it's my first proper tutorial for a while now, and don't forget to hit me up on twitter! @andyshora